“Field value has changed” alert and “Undo changes” functionality on the “Parents” student page

Remember to always back up your data before making any changes to it.
Always try out your customizations on a test server first, NOT the live one.
The following customization was tested in PowerSchool 7.11.1, so it might not work in the newer versions.
The following customization was not tested in Internet Explorer.
For this customization you will also need a pair of (preferably square and less or about 32×32 pixels) images – one for the “filed changed” alert and the other for the “undo changes” alert).

Let’s just imagine for a moment that you’re in front of a PowerSchool page with tons of input fields (like an Admission form or a Demographic page) on which you need to edit some data. What happens if, let’s say, after 15 minutes of heavy typing you realize that one (or several) of the fields that you just modified weren’t actually supposed to be modified? Or what if your mouse/keyboard is playing tricks on you and suddenly sets the cursor/focus on the wrong field (not the one you intended to write into)? (suspense)
Well, you basically have to options: either refresh the whole page (pro: you won’t change something that wasn’t supposed to be changed, con: you’re going to loose all the changes you’ve made) or just go ahead and submit the page (pro: you save your changes, con: you also save changes that weren’t supposed to be made). Hmm, things could getting pretty messy.

What if we try to make it such that we can easily spot what fields got actually modified on the page and then be able to decide which ones we’ll leave as is (modified) and which ones we’ll revert to their original value (i.e. the value that was previously stored in the database and that was displayed on page load)? That would be neat, wouldn’t it? Do you want to see how it’s done?
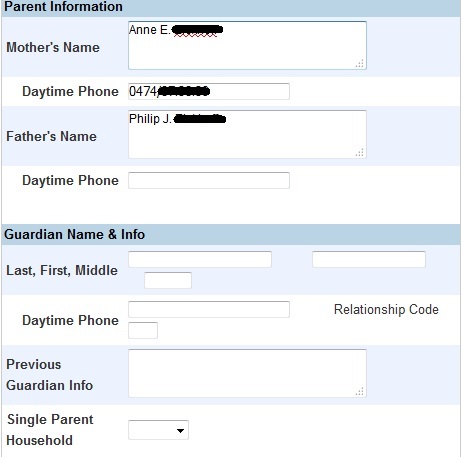
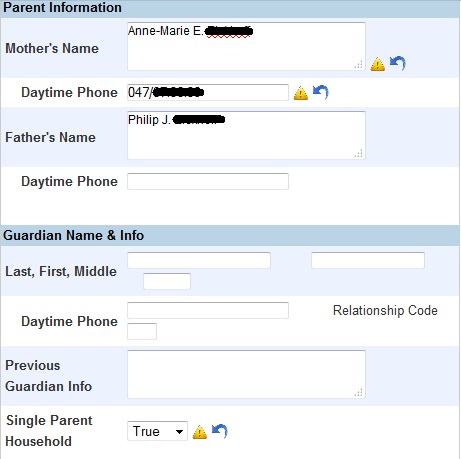
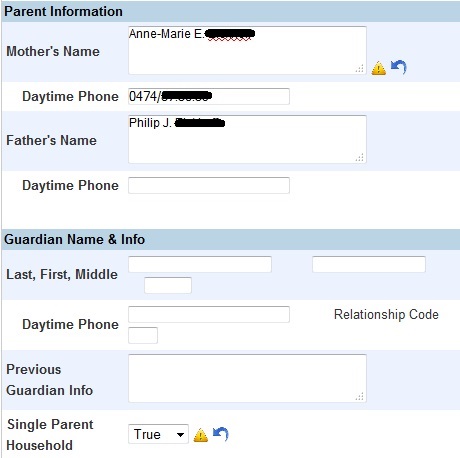
I know “a picture is worth a thousand words” so check out below the equivalent of an Extended Essay:

"Field value changed" alert - before the changes

“Field value changed” alert – before the changes

"Field value changed" alert - after the changes (Daytime Phone wasn't supposed to be changed!)

“Field value changed” alert – after the changes (Daytime Phone wasn’t supposed to be changed!)

"Field value changed" alert - keep all changes but revert the Daytime Phone to its original value

“Field value changed” alert – keep all changes but revert the Daytime Phone to its original value

Now we can safely submit the data on the page – we are sure that only the fields that need to be saved are actually saved.

Do you still want to see how it works? Well, brace yourselves; here it comes.

Let’s choose, for example, the Parents student page to be our Guinea pig for the day. I’ll start from the assumption that you already have a copy of the needed file (parentsguardian.html in /admin/students ) in your PowerSchool customization folder.

  1. Open the file in a text editor and locate the closing head tag (</head>).
  2. The customization is based on JavaScript/jQuery code but has some CSS added to it too. We’ll start with the latter first.
  3. Add the following piece of CSS code just above you </head> tag.
    <style>
    /* define class for the images to be placed next to the monitored fields */
    img.imgHidden{
        /* hide the image by default */
        visibility: hidden;
        /* set the image to the desired size */
        width: 16px;
        height: 16px;
        /* no border */
        border: 0px;
        vertical-align: text-top;
    }
    /* define class for the “undo” images */
    img.imgUndo{
        /* make the hand cursor show when hovering over the image (to emulate a link) */
        cursor:pointer;
        cursor:hand;
    }
    </style>
  4. Just between the ending </style> and </head> tags add a pair of script tags (<script></script>). All the code to follow on this page will be placed in between those <script> tags.
  5. Let’s define the HTML code (containing the two images) that will be added after each monitored field that got its data modified since the page loaded and also the HTML code of the hidden field that will hold the value of the monitored field.
    var hiddenImages = ” <img src=’modified_warning.png’ class=’imgHidden’ title=’Field value has changed since the page was loaded’ />”;
        hiddenImages += ” <img src=’undo.png’ class=’imgHidden imgUndo’ title=’Reset field to original value’ />”;
    var hiddenDouble = “”;
  6. Now let’s define a function that places the value of each monitored field into a hidden field and then inserts the hidden field and the two images after the main field (only if the latter’s value is not blank).
    function createDoubles(monitoredElem){
        $j(monitoredElem).each(function(){
            //do this only for non-blank and non-null fields
            if ($j(this).val() != “” || $j(this).val() != null){
                //add a hidden element who’s value is equal to the value of the monitored field
                hiddenDouble = “<input type=’hidden’ value='” + $j(this).val() + “‘ />”;
                //add the hidden field and the images after the monitored field
                $j(this).after(hiddenDouble + hiddenImages);
                }
        });
    }
  7. The following function checks to see if the value of the monitored element was changed since the page was loaded and if it was, display the two images.
    function checkForChanges(myElem,myElemType){
     //if element is of a certain type
        if (myElemType == “INPUT” || myElemType == “TEXTAREA” || myElemType == “SELECT”){
            //and if it’s value is different than what was stored for it on page load
            if (myElem.val() != myElem.next().val()){
                //show the next two icons (Alert and Undo) found after the monitored element
                myElem.nextAll(‘.imgHidden’).eq(0).css(‘visibility’, ‘visible’);
                myElem.nextAll(‘.imgHidden’).eq(1).css(‘visibility’, ‘visible’);
            }
        }
    }
  8. After the entire page has loaded in the browser we can define the elements that we monitor. Then, for each of them, create the “hidden field doubles”. Upon any “input” or “change” event on a monitored element check if its value changed since the page loaded and if so display the two images next to it. If an “undo” image is clicked than the value of its associated monitored element will be reverted to the initial one and the two images will be hidden.
    $j(document).ready(function(){
        //define elements which the images and the functionality should bind to
        var monitoredElem = “input[type=text]:not(‘.psDateWidget’), textarea, select”;
        //create the ‘hidden doubles’
        createDoubles(monitoredElem);
        //cycle through all the monitored elements
        $j(monitoredElem).each(function(){
            //get element type
            var elemType = $j(this).prop(“tagName”);
            $j(monitoredElem).on(“input change”,function(){
                //check for changes
                checkForChanges($j(this),elemType);
            });
        });
        //on clicking on the “undo” image
        $j(“.imgUndo”).on(“click”, function(){
            //set the value of the element to the intial value (when the page was loaded)
            $j(this).prev().prev().prev().val($j(this).prev().prev().val());
            //hide the “undo” icon
            $j(this).css(‘visibility’, ‘hidden’);
            //hide the “alert” icon
            $j(this).prev().css(‘visibility’, ‘hidden’);
        });
    });

And here’s how you can easily stay out of trouble. Cheers! 🙂

Show/hide characters in password fiels on the “Access Accounts” student page

Remember to always back up your data before making any changes to it.
Always try out your customizations on a test server first, NOT the live one.
The following customization was tested in PowerSchool 7.11.1, so it might not work in the newer versions.
The following customization was not tested in Internet Explorer.
For this customization you will also need a pair of (preferably square and less or about 32×32 pixels) images – one for the “show password” state and the other for the “hide password” state).

About two years ago the secretaries at my school asked me how they could check students’ passwords in case a student shows up in their office complaining about not being able to log in to PowerSchool. They also wanted to quickly find out the students’ Access ID and Access Password codes the parents were asking them all the time when they wanted to add a kid to their parent accounts.
Oh, don’t worry, they didn’t want to handle any massive spreadsheet or go through the process of exporting based on a template (done for the whole division, most probably). No, they wanted a way to see the data on a student page, just like any other piece of demographic data. What, another custom page just for that? Really?!?!

Well, my secretaries’ requests, combined with my natural aversion towards creating unnecessary files in my already clogged web_root folder, gave me the idea of reusing a page that’s “already there” – the Access Accounts student page. I was pretty sure that by slightly transforming (enriching would be a better word) the this page (accessaccounts.html found in the /admin/students folder) I’ll be able to help them out but still keeping the mess at a (historical) minimum. 😉
OK, so let’s see if I succeeded or not, shall we?

Starting from this:

Student Access Accounts page (password fields detail) - before

Student Access Accounts page (password fields detail) – before

I want to get something like this:

Student Access Accounts page (password fields detail) - after

Student Access Accounts page (password fields detail) – after

I’ll start from the assumption that you already have a copy of the needed file (accessaccounts.html in /admin/students ) in your PowerSchool customization folder.

  1. Open the file in a text editor and locate the closing head tag (</head>).
  2. The customization is based on JavaScript/jQuery code but has some CSS added to it too. We’ll start with the latter first.
  3. Add the following piece of CSS code just above you </head> tag.
    <style>
    /* for the image to be placed next to the password fields */
    img.imgLock{
        /* set the image to the desired size */
        width: 16px;
        height: 16px;
        /* no border */
        border: 0px;
        vertical-align: text-top;
        /* make the hand cursor show when hovering over the image (to emulate a link) */
        cursor:pointer;
        cursor:hand;
    }
    </style>
  4. Just between the ending </style> and </head> tags add a pair of script tags (<script></script>). All the code to follow on this page will be placed in between those <script> tags.
  5. After the entire page has loaded in the browser show a lock image next to any password field (there are only two) that is not empty. Upon clicking on the image show/hide the characters inside the password field next to it.
    $j(document).ready(function(){
    //define the student password and student access password fields (as HTML Objects)
        var studPass = $j(“input[type=password]:first”);
        var studAccPass = $j(“input[type=password]:last”);
        //define the image files used when showing and hiding the passwords
        var imgShow = “accessacountsopen.png”;
        var imgHide = “accessacountslock.png”;
        //if the student password is not blank add the lock image next to the password field
        if (studPass.val() != “”) studPass.after(” <img src='” + imgShow + “‘ class=’imgLock’ title=’Show ” + studPass.parent().prev().text() + “‘ /></a>”);
        //if the student access password is not blank add the lock image next to the access password field
        if (studAccPass.val() != “”) studAccPass.after(” <img src='” + imgShow + “‘ class=’imgLock’ title=’Show ” + studAccPass.parent().prev().text() + “‘ /></a>”);
        //fire function upon clicking on the lock image
        $j(“.imgLock”).on(“click”,function(){
            //get the password field (as HTML Object)
            var fieldObj = $j(this).prev();
            //check what image is currently displayed
            //if current image is “open”
            if ($j(this).attr(“src”) == imgShow){
                //change image to “locked”
                $j(this).attr(“src”,imgHide);
                //change the title of the image to say “hide … password”
                $j(this).attr(“title”,”Hide ” + $j(this).parent().prev().text());
                //check the name attribute of the password field (to check whether it is the Student or the Access Password)
                //if this is the Student Password field
                if (fieldObj[0] == studPass[0]){
                    //change type to TEXT
                    fieldObj.attr(“type”,”text”);
                    //set the value to “Student_Web_Password” (PS tag)
                    fieldObj.val(“~(Student_Web_Password)”);
                }
                //if not then this must be the Guradian Web Password field
                //just change type to TEXT
                else fieldObj.attr(“type”,”text”);
            }
            //if current image is “locked”
            else{
                //change image to “open”
                $j(this).attr(“src”,imgShow);
                //change the title of the image to say “show … password”
                $j(this).attr(“title”,”Show ” + $j(this).parent().prev().text());
                //check the name attribute of the password field (to check whether it is the Student or the Access Password)
                //if Student Password
                if (fieldObj.attr(“name”) == studPass.attr(“name”)){
                    //change type back to PASSWORD
                    fieldObj.attr(“type”,”password”);
                    //set the value back to “*****”
                    fieldObj.val(“*****”);
                }
                //if Guradian Web Password
                //just change type to back to PASSSWORD
                else fieldObj.attr(“type”,”password”);
            }
        });
    });

How did I do?